What are Artifacts in ultrasound imaging?
Artifacts in ultrasound imaging are normally specks or dots or white patches of noise or image dropouts visible in the image obtained from Ultrasound scans. They could be seen as reverberations or missing data due to various reasons like damaged probe, scanner issues, RF interference, poor resolution or lack of depth of penetration, incorrect target location due to increased side lobes or mulltipath reflections and incorrect object size or object shape due to poor spatial resolution etc.
Artifacts are one of the major sources of nuisance to users in ultrasound imaging. They can be often confusing and in worst cases cause totally avoidable misdiagnosis.
In general, we can group imaging artifacts in two categories
- related to violation of assumptions built into ultrasound imaging equipment and
- related to equipment defects or interference by external equipment and devices.
Ultrasound assumption violations may lead to the following types of artifacts – Comet tail, Simple reverberation, Mirror image, Acoustic enhancement, Acoustic shadowing, Refraction, Side lobes, Beam width etc. Clinicians can read more about these types of artifacts.
In this blog we are going to focus on artifacts resulting from probe or scanner issues or external RF or electrical interference. These are the types of artifacts in ultrasound imaging, clinical engineers or bio-medical engineers would be called upon to address within hospitals.
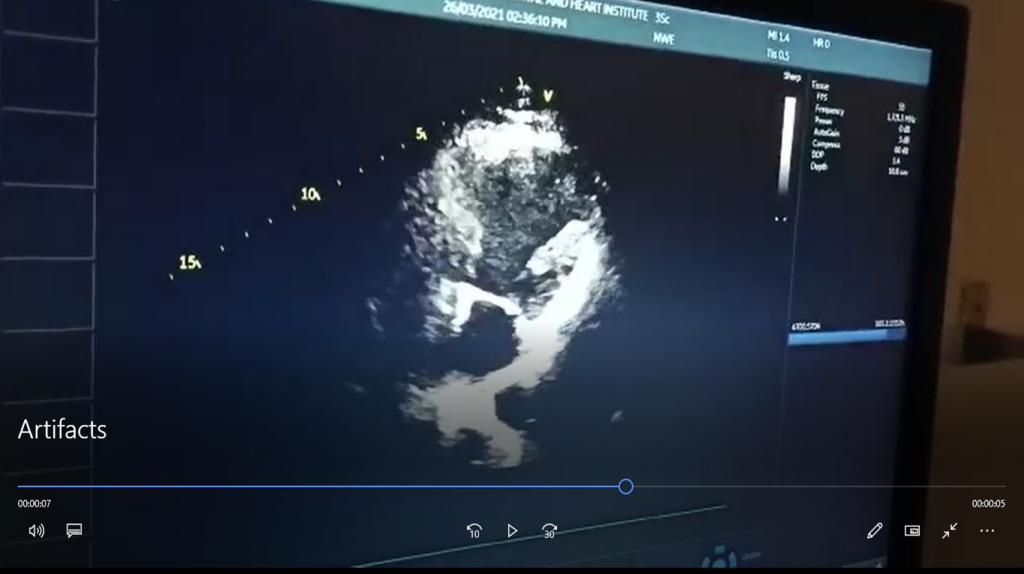
Image with artifact
Image without artifact
Artifacts caused due to probe or scanner defects or external interference
Causes of artifacts in ultrasound imaging can be categorised into three major types.
- Probe/ Transducer related – One obvious reason for artifacts occurring is transducer element (Crystal) damage. Others could be probe cable or connector pin related. Unfortunately, the transducer or probe is the main part of ultrasound machine subjected to misuse, poor handling and bad maintenance practices – potentially damaging it. In diagnostic ultrasound imaging, the overall condition of the transducer is one of the most critical factors in the quality and accuracy of the investigation results.
- Scanner related – Problems with connector ports on the scanner or the front-end PCB could also cause artifacts.
- External interference causing Noise artifacts – If it is neither related to probes nor to the scanner, it possible that there some electrical problems or RF interference causing image artifacts. Noise artifacts can be some of the most challenging problems to troubleshoot. Many noise artifacts are intermittent and based upon factors other than the scanner and probe – making it harder to isolate. Manufacturers design their ultrasound scanners and transducers to limit their susceptibility to internal and external RF (Radio Frequency) interference. The majority of today’s transducers are specifically designed for increased RF noise suppression. Still, there is no scanner or transducer that is totally impervious to strong sources of RF energy. The suppression of RF interference is mainly accomplished by surrounding the scanner and the transducers with a shielding that is directly attached to the system or earth ground. Any interruption in this direct connection to the grounding system can cause the scanner and/or the transducer to become more susceptible to internal and/or external RF energy.
Artifacts in Ultrasound Imaging – presentation, causes & what to check
Let us look at how artifacts may present themselves, possible cause(s) and how to identify the cause or source of problem.
| S.no. | Artifact presentation | Potential Cause | What to check? |
| 1 | A single, clear vertical line of image ‘dropout’ in the image. | Probe connector/pins | Physically inspect the connector for bent, missing, corroded pins/plate |
| Probe array/ elements | Assess image quality using a transducer of the same make and model using the same settings on the scanner. | ||
| 2 | Multiple vertical lines of dropout that appear/ disappear when the cable or strain relief is moved. | Probe cable | Using Colour Doppler mode, wiggle the cable and strain relief looking for flashing of colour in the image.
|
| 3 | When on colour flow mode vertical moving lines can be seen | Probe lens/ Probe cable | 1. Check earthing voltages
2. Check probe lens for holes or cracks 3. Check probe cable for punctures or 4. Probe head physically cracked or damage |
| 4 | Intermittent issues such as image dropout, probe identification issue, probe initialization errors, over-temperature errors.
|
Scanner connector ports | 1. Physically inspect the connector for any bent or damaged pins.
2. Periodically ensure cleaning of connector ports. 3. Check the probe in another scanner. |
| 5 | Image dropout occurring irrespective of probe or port, a double image, no image and error codes when a probe is initialized
|
Scanner board issue | If the probes and the scanner connector probes are fine, then the PCB may be faulty and need replacement. |
| 6 | Irregular, Intermittent or frequent Noise Artifacts
– White spots/dot or patch moving |
Earthing/ Grounding issue/ RF interference | 1. Poor connection to the earthing system
2. Broken or loose wires within the receptacle 3. A broken or loose ground wire in the scanner’s power cord 4. Too much dust, rat waste or other types of debris within the scanner/ boards 5. Bad physical connections between the scanner and the transducer 6. Broken or loose shield wiring within the probe or scanner 7. Any damage to RF shielding and/or earthing system. |
How to handle noise issues in ultrasound machine?
Solving noise issues could be a frustrating, tedious job or interesting detective work! Only by way of thorough investigation and process of elimination can the source of interference actually be identified. The most important thing for a clinical engineer is – to witness the noise personally so that the type of artifact / noise can be correctly identified and the rigorous process of elimination can be carried out properly.
General steps to isolating source of noise/ artifacts in ultrasound machine
General steps to be followed:
- Check and isolate if the problem seems to be related to only one specific probe.
- If there are multiple sonography machines, check and isolate if the problem happens with one specific machine
- Identify if the problem happens within one specific room/region/floor. Isolate the exact location and the electrical point being used.
- Check if the problem happens at a specific time of the day?
If the problem is with a single scanner
- Perform an electrical safety inspection on the scanner & the probe.
- Temporarily unplug or remove them from the immediate environment to eliminate problems with the area and electrical outlet.
- Thoroughly clean the scanners internal PCB’s and power supply. Assure that the air filters have been cleaned on the scanner.
- Identify if the problem is only occurring when using a specific connector port.
- Check if micro-pins within the connector ports have worn-out over time causing poor connectivity.
- Closely examine the connector ports on the scanner & the probe and routinely clean the connector ports on all scanners.
- Check that the grounding straps/RF fingers/RF springs, surrounding the connector ports, are present and not damaged.
If the problem is located within a location
- Isolate to a single electrical outlet or electrical circuit.
- Check for impact from other sources of RF energy like other
- medical equipment – CT, MRI, X-ray, motors, telemetry systems etc.).
- devices such as Microwave ovens, gel warmer, mobile phone etc. which may be located in the same room/ floor, nearby room, above or below the specific location on other floors. devices or mobile phones operating within 10 feet of a probe can cause noise or image distortions.
- Common sources of external RF interference and noise could be
- Overhead lighting and surgical light sources,
- Microwave ovens,
- Mobile phones or land-line phones,
- Photocopy machines,
- TV/ radio or communication devices such as walkie-talkie
- Other medical equipment or even
- other ultrasound machines. Please note gel warmers have often been cause of noise interference.
What to check in the electrical/ earthing system for ultrasound machines?
- UPS or battery: Check for faulty or defective batteries, replace them if necessary.
- Confirm that machine is connected with dedicated online UPS because it’s a mandatory for all stand-alone ultrasound machines. Use online UPS with isolated transformer.
- Confirm that other than ultrasound machine nothing else is connected to same electrical point. If the same point is connected to another device which has leakage current, that may also disturb image quality.
- Use electromagnetic filters
- Ensure stable temperature (20 -22°c) to ensure good health of the ultrasound machine
- DO NOT use LED lights inside the ultrasound room
- DO NOT give loop connection to same switch board
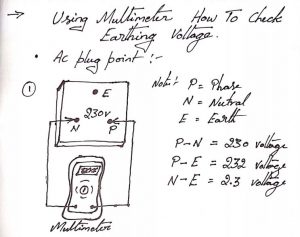
- Always keep a multi-meter to check.
- Phase, Neutral & Earthing connection and Voltages should be as follows:
- phase should be in right side of the socket
- neutral should be placed on left side of the socket and
- earthing should be on the top side of the socket in plug points.
- Following potential must be maintained
- P – N = 230V
- N – P = 230V
- P – E = 230V
- N – E = 1-4V (Neutral to Earth potential should be as low (tending to zero if possible) as possible. Please follow OEM instructions from the manual. Higher than prescribed voltage potential is likely to result in poor image quality.
PrimedeQ is an eMarketplace for medical equipment. We offer all types of imaging equipment including used / refurbished GE ultrasound machines and other used ultrasound machines from Philips and Seimens. We also assist in ultrasound machine repair and probe repair & maintenance services at www.Primedeq.com. Contact us at +918971223957 or +917019759765 for all your medical equipment related needs.
https://in.linkedin.com/in/shanthi-mathur-ab07838